Turtle Graphics for Beginners
The Beginner's Guide to Python Turtle Library


Turtle graphics was first developed by Wally Feurzeig, Seymour Papert and Cynthia Solomon in 1967. It was part of the original Logo programing language. In Python it is a pre-installed library that allow users to draw different shapes, pictures and paintings on a virtual canvas. It comes with many methods and functions that we will use to create different designs and images. Turtle graphics is a popular way of introducing kids to the world of computer programming.
In order to use the Turtle library we must import it. We use the following command.
import turtle
This means that we can now access all the methods and functions in the Turtle library. Now we need to initialize our turtle object. Lets name our turtle "tim". We can achieve this by writing this command.
tim = turtle.Turtle()
Lets run our command. Notice that there is a white canvas screen that appears and quickly disappear. This means that we need to write another command that controls our canvas screen. We can do this by writing this command
import turtle

tim = turtle.Turtle()


screen = turtle.Screen()
screen.exitonclick()
This command makes our canvas appear and only disappear when we click on it. When we run the command notice a small black pointer at the middle, that is our turtle 'tim'. Doesnt look like a turtle at all, dont you worry we can change the shape to a turtle using this command
tim.shape("turtle")
This function parameters name must be a string which is a valid shape name. The following polygon shapes comes as standard, “arrow”, “turtle”, “circle”, “square”, “triangle”, “classic”.
import turtle

tim = turtle.Turtle()
tim.shape("turtle")


screen = turtle.Screen()
screen.exitonclick()
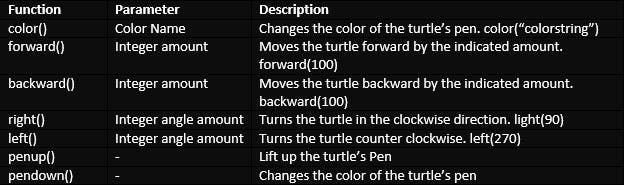
Now get ready for some cool stuff. We are going to use the following functions to make "tim: move around and draw shapes
first lets change the color of "tim" so that he looks more like a turtle.
import turtle

tim = turtle.Turtle()
tim.shape("turtle")
tim.color("green")


screen = turtle.Screen()
screen.exitonclick()
Draw a line
To make "tim" move forward we use the tim.forward(100) command as in the table above. Try running the command and see what happens. Notice "tim's" color has changed to green and he moves forwad a hundred pixels drawing a green line.
Draw Square
Lets write a function command that will make "tim" draw a square. Copy this command and run it.
import turtle

tim = turtle.Turtle()
tim.shape("turtle")
tim.color("green")

def draw_square():
    for i in range(4):
        tim.forward(100)
        tim.left(90)


draw_square()


screen = turtle.Screen()
screen.exitonclick
Draw a dashed line
From the turtle documentation to draw a dashed line we use the following functions
penup()
and
pendown()
We are going to use a function to show this example. Copy and paste the following commands on to your text editor and run.
import turtle as t

timmy = t.Turtle()


def draw_dash_line():
    for i in range(15):
        timmy.forward(10)
        timmy.penup()
        timmy.forward(10)
        timmy.pendown()


draw_dash_line()


s = t.Screen()
s.exitonclick()
Drawing a star
As you can see from the begining, we started with less complex shapes and now we are moving to a bit complex shapes. The trick here is to get the angle just right, so after some twerking I have settled for 144 degrees to use in the
right() function. Try the following commands and see if you can draw a star. Just for fun try changing the angle and increasing the
range() to see what you can come up with
import turtle

star = turtle.Turtle()

for i in range(5):
    star.forward(200)
    star.right(144)

turtle.mainloop()
Drawing polygons
We can also draw different polygons by dividing the angle(360 degrees) by the number of sides we want. Use the following code to draw a six sided polygon. Note that you can play around with the number of sides to draw whatever shape you like. Notice that I have used a new function
goto() which takes two parameters in the form of x-axis and y-axis to move our turtle to different positions on the canvas.
import turtle
tim = turtle.Turtle()
tim.penup()
tim.goto(-150, 150)
tim.pendown()

number_sides = 6
side_length = 200
angle = 360.0 / number_sides

for i in range(number_sides):
    tim.forward(side_length)
    tim.right(angle)

turtle.mainloop()
Drawing all shapes
Now lets improve our code above so that we can draw all shapes and in different colors.
import turtle as t
import random

timmy = t.Turtle()
timmy.penup()
timmy.goto(-150,150)
timmy.pendown()


colors = ['green', 'purple', 'black','blue','purple', 'yellow','orange','red','grey']


def draw_shapes(num_sides):
    angle = 360/num_sides
    for i in range(num_sides):
        timmy.forward(100)
        timmy.right(angle)

for i in range(3,11):
    timmy.color(random.choice(colors))
    draw_shapes(i)
Drawing a spiral
We will use a for loop and very few lines of code to draw a spiral polygon.
import turtle

timmy = turtle.Turtle()

distance = 2

for i in range(200):
    timmy.forward(distance)
    timmy.left(45)
    distance += 1
s.turtle.Screen()
s.mainloop()
Conclusion
In this turtle library tutorial you have been learning the turtle library and how to move the turtle around using the basic python fundamentals such as variable initialization, loops, conditional statements, indentations, lists, operators and functions. This is a great way to practice your python skills and all the concepts you have learned.
This article has been written by Tarubuda Willbroad Makuvise